


While you are a Mac owner, you may need Windows 10 to install some applications which don't work on Mac. Also, to play your favorite games which are not yet optimized for Windows 10. Either way, you are looking for a way to install Windows 10 on your Mac, but you are not sure how to do it. The procedure to install Windows on Mac is not difficult, but can be a bit daunting if you are doing it for the first time!
Don't worry! This article will cover every single step you need get Windows 10 on your Mac.
We have also created a video version showing you how to install Windows 10 on your Mac. It may be useful in case you find some of the steps confusing:
Note: If you own an older Mac computer, this method might not work. For this method, we will be installing Windows 10 with BootCamp Assistant. We have created a separate article which goes through in details which Macs are compatible for this method. If you Mac is not compatible, then you may find useful to check my other guide which shows you how to install Windows 10 on an unsupported Mac.
What do I need to begin installing Windows 10?
- Enough storage. BootCamp assistant recommends more than 50GB of storage, however, having 50GB of free storage doesn't mean that would be enough for Windows 10. I would recommend you to have at least 70GB of free space. If you are looking to install games, you are looking at 100-200GB of free space if you are planning to install the games in your internal storage. Games and Windows 10 can also be installed in an external hard drive. In case you are looking for external storage hard drives, I have compiled a whole guidance to get the best hard drive for playing games.
- Your computer plugged in if it's a MacBook (uses battery), in case it runs out of battery during the installation.
- Must be Intel based (for now).
- BootCamp Assistant must support your Mac. I wrote an article which lists all the requirements that you Mac needs to have in order for BootCamp assistant to Work.
Does Windows 10 work with T2 chip Mac?
Yes. Windows 10 can be safely be installed on your Mac without any hustle. Although this goes outside the scope of this article, you may have trouble installing Linux on your Mac with dual boot.
Does Windows 10 work with M1 Mac?
At this moment, no. Windows 10 is not currently optimized for Macs running on the M1 chip. However, Microsoft is on its way to make Windows 10 to be compatible with M1 in the near future. However, you may not want to wait until then. Parallels provide you with a way to use your Mac and Windows 10 simultaneously without the need to switch operating systems and of course, run Windows programs on MacOS.
Can I run Windows 10 well on my Mac?
Windows 10 has very low minimum requirements (taken from Microsoft Support). The requirements are listed below:
- Processor: 1 gigahertz (GHz) or faster processor or SoC
- RAM: 1 gigabyte (GB) for 32-bit or 2 GB for 64-bit
- Hard disk space: 16 GB for 32-bit OS or 20 GB for 64-bit OS
- Graphics card: DirectX 9 or later with WDDM 1.0 driver
- Display: 800 x 600
The chances of meeting the above requirements are 99%. Nowadays, Mac computers have 8GB of RAM or above, 2GHz of CPU or above with multiple cores and modern Intel or ARM graphics cards. Your Mac will definitely be able to run Windows 10 smoothly without lag. However, whether you can play the latest games, really plays a role on how new your Mac is.
How to install Windows 10 on Mac? Steps
Once you have confirmed that you are able to install Windows 10 on your Mac computer, then you are ready to begin the installation.
Download the Windows 10 ISO
First, visit the official Microsoft Website where the Windows 10 ISO is located.
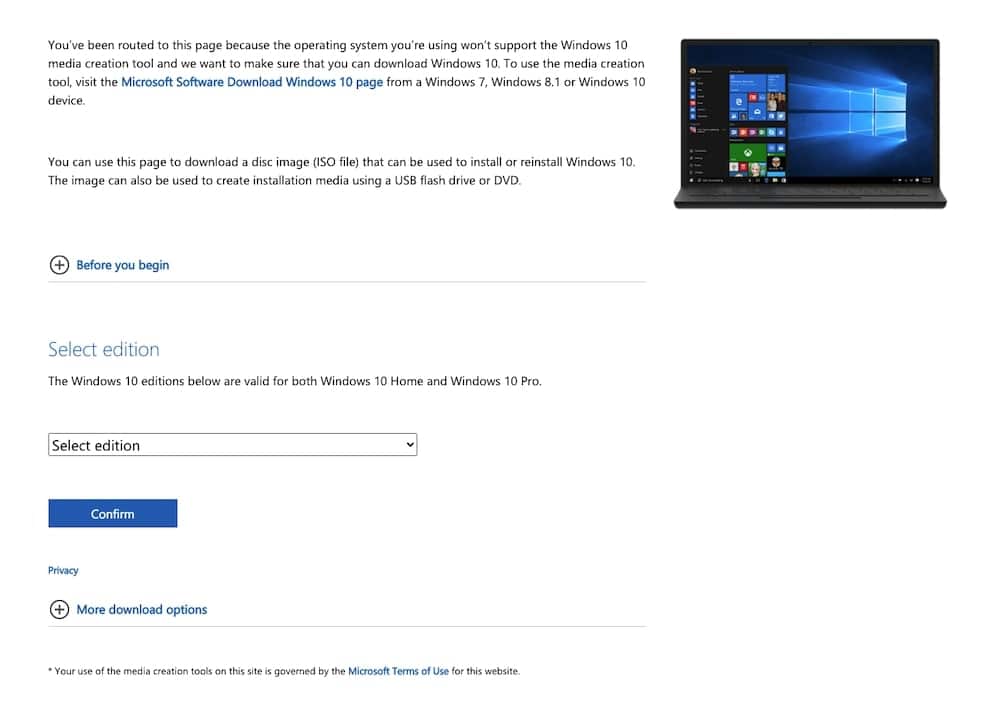
Then choose the Windows 10 edition you wish to install. Most likely, only Windows 10 will be available for download. Remember to choose on Confirm to move on to the next step. Then you need to enter the language for Windows 10. I tend to select English International, but feel free to choose your own language if available. Lastly, you will be asked to download either 64-bit or 32-bit. Choose 64 bit.
Finally, Windows 10 will begin to download. This process will take some time as the ISO is about 5.4GB.
Prepare BootCamp Assistant
Once you have Windows 10 installed, then we need to partition our storage (hard drive) and format it. No need to worry if you are not sure what these mean. BootCamp Assistant will do everything for us within a few clicks.
However, BootCamp Assistant recommends us to backup all of our data before using it. Although it's unlikely for something to happen, but it's highly recommended to backup all of your data before using BootCamp. Here, I have created another video showing the full process to backup your data:
If you don't have an external hard drive to backup your data, then I am sure this article I wrote will also help you to choose the best external hard drive for backups.
Allocate space for Windows 10 and create the partition
Once everything is done, launch Boot Camp Assistant from Applications > Utilities. You will find the Applications folder by clicking on Finder from the bottom left Doc bar and click on Applications on the left of the Finder Window.

Then, Boot Camp Assistant will open. From it, you need to click on Continue.

At this point, you may need to unplug all connected devices to your computer if any. Please note that if you have already installed Windows 10 via BootCamp on your Mac, then BootCamp Assistant will need to remove the previous BootCamp for this to work. You wont be able to have two BootCamps at the same time.
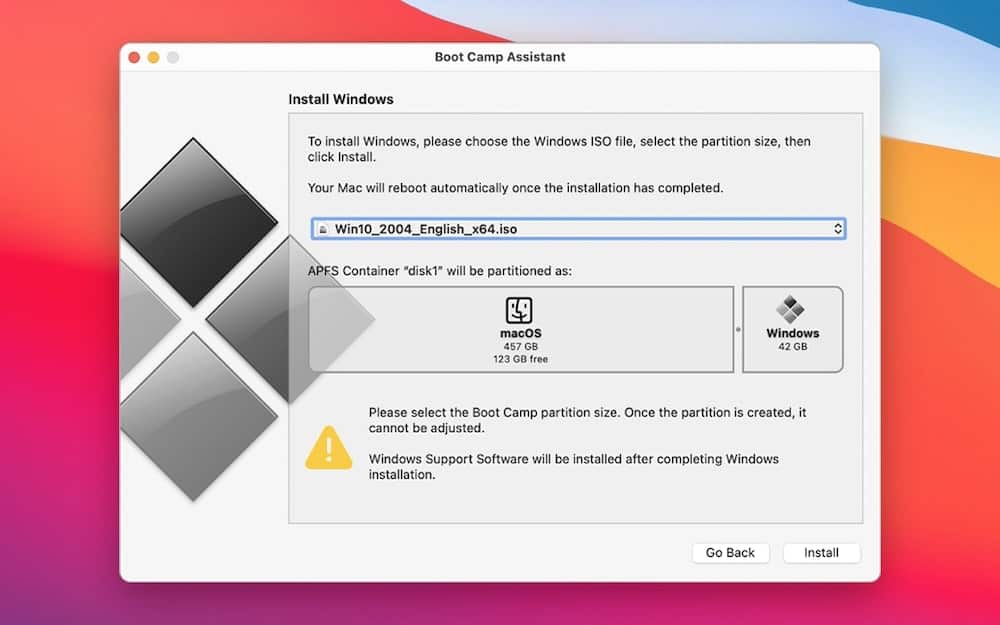
Here, you may resize the Windows 10 partition, so how much storage space you would like to have on Windows 10. Be careful, as you won't be able to increase or decrease Windows 10 size in the future. Make sure to pick an amount of storage that you will be happy with. Next, choose the Windows 10 ISO file that you just downloaded. Make sure to click on the Browse button and choose the Windows 10 ISO file from your Downloads folder.
Once you are happy with the storage partition, then click on Install at the bottom right.
Now BootCamp is creating the partition and installing Windows 10. This process should take some time to finish depending on how much data you have on your hard drive.
Windows 10 installation
Once the process is done, your Mac will reboot to the Windows 10 partition.

All you need to do now is to go through the Windows 10 installation process which means that you need to set up stuff like languages, Microsoft account, Cortana etc. Don't worry. We will go through it step by step.
Initially, the first step asks you to set the language you would like to use to install Windows 10 and the keyboard layout to use. Choose the layout you are typically use. If unsure, choose either the US one, or your country's layout.

Next, insert the Windows 10 product key. You will typically find it if you have purchased a copy of Windows 10 prior installation. If you don't have one, then no need to worry! You will still be able to use the vast majority of Windows 10 features but you wont be able to personalize Windows 10, such as changing the wallpaper. To skip entering your product key, press on I don't have a product key.

Here, you need to select the Windows 10 OS that you need to install. If you don't have a preference, then choose Windows 10 Home. If you have purchased a Windows 10 key, be sure to select the correct Windows 10 according to your purchase. Next, agree with the Terms.

Now, Windows 10 is going to install all the contents to your computer. Please, do not turn off your computer while this process is working.
Finally, once Windows 10 are installed, you need to set them up. This includes setting up the following:
- Choose your region
- Choose your keyboard layout
- Connect to your Wi-Fi network
- Create/Log in to your Microsoft account
- Setup your Windows 10 login PIN code. Make sure to remember this as you will use this to log in on Windows 10.
After this, the steps are pretty straightforward, including setting up or enabling some features that Windows 10 is providing to you, such as voice assistance, helping Microsoft to improve their products questions etc. I have personally skipped most of them to simplify the process, but you can always enabled them from the settings in the future.
Installing the Windows 10 drivers
We are almost there. Now you should see your Windows 10 desktop and the BootCamp Installer should be opened. The BootCamp Installer includes all the drivers needed to get Windows 10 to run on your system smoothly.

From here, press on next and agree with the terms. Then, all the drivers will be installed at once in your Mac. That's the beauty with BootCamp Assistant. You don't have to do everything manually and one-by-one. Of course, keep in mind that your Mac will do some glitches during the drivers installation, so no need to worry about that.
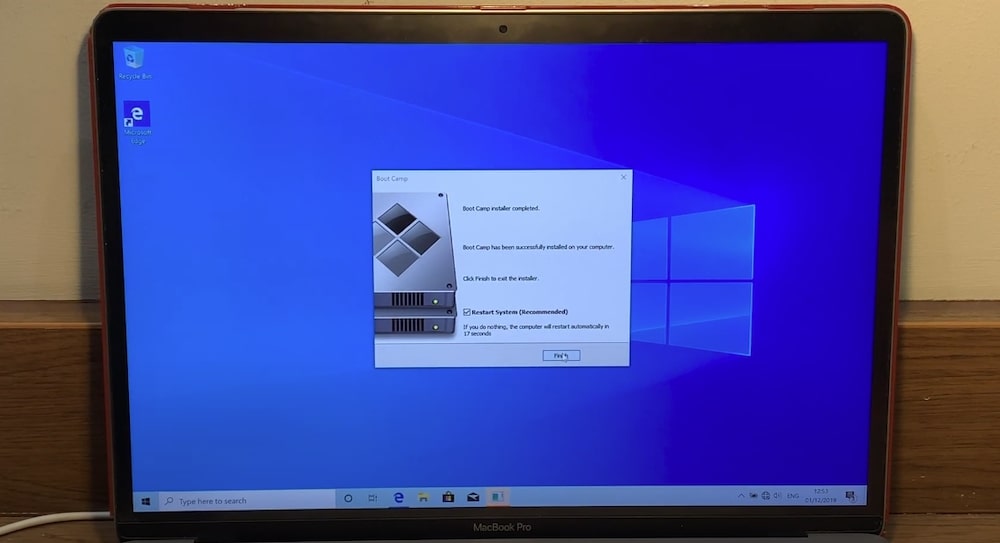
Once the BootCamp Assistant has finished installing all the Windows 10 drivers on your Mac, then click on the Finish button and your Mac will restart to finalize the drivers installation. Once your Mac reboots, it should reboot on Windows 10 automatically.
If it reboots on MacOS, then Restart it again and hold down the alt key (between ctrl (control) and cmd (command) keys on the bottom left of your keyboard) and once your Mac reboots, you should see all the drivers icons. Choose Windows 10 (or BootCamp).
Finally, enter the PIN code and you are ready to use Windows 10 whoever you like!

Here are some ideas of what you can do with Windows 10:
- Install Steam and download your favorite games!
- Download programs that you tried running on Mac.
- Try running programs that are better optimized for Windows such as Adobe Cloud (Photoshop, After Effects etc).
How to boot on Windows 10 or MacOS?
When you turn on your Mac, hold down the alt key. Here, you will have some options such as Windows and Mac or BootCamp (Windows 10) and SSD (MacOS).
Conclusion
Congratulations! Now you may enjoy using both Windows 10 and MacOS on a single computer and enjoy your favorite games.
Of course, if you have any questions, I would love to hear them! Feel free to drop them below in the comments section and I will answer as soon as possible. Finally, I enjoy writing these articles as much as enjoying hearing your feedback. If you have any ideas where I could make these articles better, don't hesitate to let me know!
I hope you stay safe and healthy!

Ταξινόμηση:
Εμφάνιση: