


As a macOS user I was very frustrated with some of the changes macOS Catalina brought on the table. For example, the end of 32-bit support. I was relying to some 32-bit applications to get my work done faster, but with the end of support for those apps, I had to switch some of those outdated applications and there were very limited alternatives; not suited very well for my work environment.
In this article, I am going to show you how to downgrade back to macOS Mojave without losing any of your data. It's a bit lengthy tutorial, but by strictly following every step, you will get your job done without any worries.
You'll need
- USB stick (at least 8GB of storage)
- External Hard Drive (doubling your Mac total capacity)
Furthermore, we have made a video which this article is based upon:
Before proceeding to this tutorial, check our following video to see how to backup all of your data with Time Machine:
Once you are all setup, proceed to the tutorial by following the steps below.
Disclaimer: If you are a developer, keep in mind that you may need to reproduce your development environment. For example, I had to update to the latest version of PHP and re-install the composer package manager and all packages I was using for my web app projects. This may apply to other programming languages such as C++, Ruby and package managers such as JavaScript’s npm. Mainly, you will notice that you have downgraded to a previous version of these languages and you may need to update these languages manually to their latest version.
Furthermore, if you have downloaded apps which are only compatible with macOS Catalina, they may not work with Mojave (after you downgrade).
I include all the commands in the end of the article, although I STRONGLY recommend you read through the steps to avoid ANY possible mistake.
Please, keep in mind that if you have a Mac computer which was released later than mid 2019, chances are that downgrading to MacOS Mojave won't work. Apple prevents you from installing older OS than your device's release year. By all means, it's still worth to try, but if it doesn't end up working, you will need to re-install MacOS Catalina on your machine.
In case you're looking to downgrade from a newer MacOS version to Mojave, I have written an updated version below:
Steps
- First, we need to download the macOS Mojave installer utility. We are going to use that to install macOS Mojave later on. For that we are going to use Terminal. Either go to Finder > Applications > Utilities and launch Terminal.

or go to spotlight search (by clicking on the magnifier on top right corner of the screen) and type "terminal" and press enter.
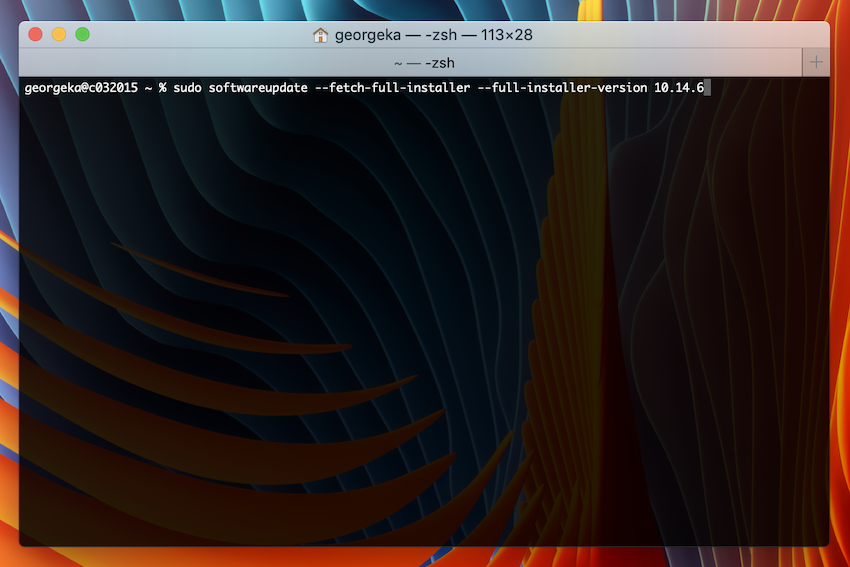
- On terminal, type the following command
sudo softwareupdate --fetch-full-installer --full-installer-version 10.14.6. This command will download the latest version (10.14.6) of macOS Mojave to your Mac. Once you type it, hit the enter key.
The--full-installer-versionflag indicates the installer version to download and the--fetch-full-installerflag (actually,--full-installer-versionis a flag or parameter of--fetch-full-installer) indicates that the software to be downloaded is an installer. - Type your password you use to login to your Mac and then hit enter again. Beware that you won't see any dots while typing your password.
Now terminal will download the macOS Mojave installer utility. While it's downloading, we can move on with formatting our USB stick. - Now go to Applications > Utility and launch Disk Utility.
- From Disk Utility, make sure all devices are visible on the left. If not, follow step 6.
- Click on the top left button and select Show Sidebar (if by default is hidden) and make sure Show All Devices is ticked (click on it if it's not).
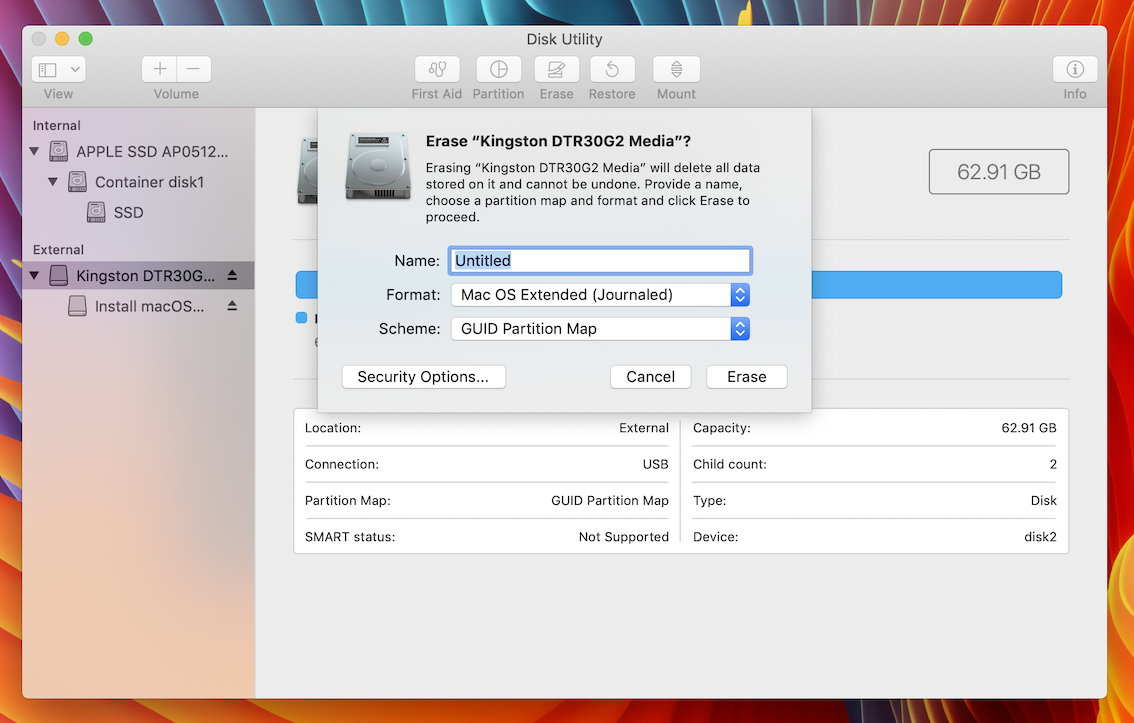
- Now connect your USB stick to your computer and then it should appear on the list to the left. In my case, is named as Kingston DTR30G2 Media.
Please make sure to backup your data from your USB stick if you have any. Maybe you can copy them to another Computer or storage device, as the following procedure, will erase everything from your USB. - Click on the Erase button on the top middle.
- A menu should open up. Here you need to choose the way you want to format your USB stick. Make sure the Format is set as Mac OS Extended (Journaled) and the Scheme as GUID Partition Map. For ease, I will name my USB stick as "mojave". Once you are done, click on Erase.
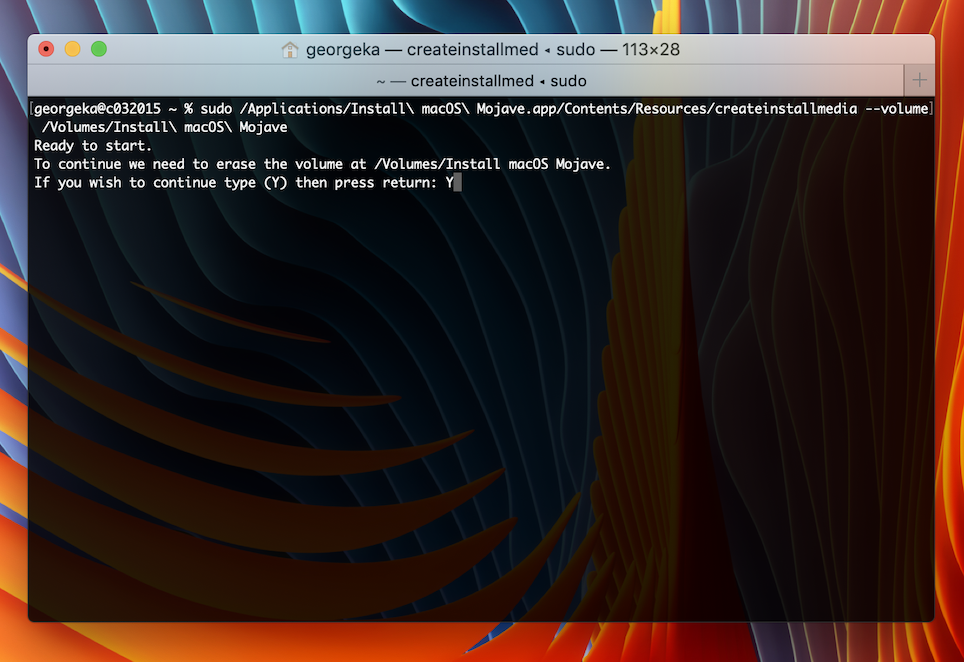
As a side note, on my video I have misspelled "mojave" to "mohave". If you spotted the spelling error, comment below! - Now wait until the Terminal has finished downloading the Mojave Installer app. Once it's done, we are ready to turn our USB stick into an macOS Mojave Installer Drive. For this, we are going to use the following command
sudo /Applications/Install\ macOS\ Mojave.app/Contents/Resources/createinstallmedia --volume /Volumes/mojave.
This command executes thecreateinstallmediaprogram located in the/Applications/Install\ macOS\ Mojave.app/Contents/Resources/path. The--volumeflag or parameter tells createinstallmedia, the volume (or device) path where to burn the Mojave installer. In our case, our volume is located to the/Volumes/mojavepath. - Now you will be asked whether you would like to continue the process, giving you a warning that your USB stick will be erased. Type in "Y" and then hit the return key.
Now you need to wait for a few seconds or minutes until the Installer is burned to the USB stick. Once the installation is done, we are now ready to start replacing macOS Catalina with macOS Mojave. - At this point, we need to enter the recovery mode. To do this, reboot your Mac and once the screen turns black, hold down the command and R key from your keyboard (â + R) to enter Recovery Mode.
- Now, if you have a mac which contains the T2 chip, follow steps 14-15, but if not, skip to step 16. The following Mac computers (as of 2020) have the T2 chip.
These are the following Mac computers (as of 2020) which have the T2 chip.- iMac Pro
- Mac Pro (2019 or later)
- Mac Mini (2018 or later)
- MacBook Air (2018 or later)
- MacBook Pro (2018 or later)
- On the menu bar on the top, go to Utilities and then choose Startup Security Utility.
- Now you will need to Authenticate yourself. Click on the Enter macOS Password... button and enter your password.
- Now Startup Security Setup should open. From here from Secure Boot, choose No Security. This allows your computer to read any formatted device connected to your computer (including Linux or Windows formatted Installer Disk) and from Allowed Boot Data, select Allow booting from External or removable media. This allows your Mac to boot from any external device connected to your computer regardless whether it's protested by the T2 chip or not.
- Then quit Startup Security Utility. Now you should be back to the Recovery Mode Main Menu. Now we are going to erase our main Hard Drive, meaning that all of your data will be lost. At this point, you should have done a backup of all of your data. From the Menu, choose Disk Utility.
- From Disk Utility, select either your whole Hard Drive (in my case is named as APPLE SSD AP0512M Media), keep in mind that this will also erase your partitions as well (including Windows Boot Camp if you have one) or your Mac partition (in my case is named as Container disk1), where this will keep your Boot Camp partition and other partitions you may have.
- Once you choose your partition/Hard drive, click on Erase on the top middle.
- Here you need to tell how Disk Utility should format your partition/Hard Drive. Make sure the Format is set as APFS (Apple File System) and Scheme as GUID Partition Map. Feel free to name your Disk/partition whatever you like! In my case, I will just name it as SSD. Once you are done, click on the Erase button.
- At this point, make sure the USB is still connected to your Mac and your external Storage device which you have your Time Machine backup. Finally, close Disk Utility and Reboot (Restart) your system. Hold down the option key next to the command key.
- From the Boot Menu, select Install macOS Update by hitting enter. Now your Mac will boot from your USB stick (in this case, it could be unnecessary to hold down the option key while restarting the device, as the USB stick was the only device which your Mac could boot from).
- You should end up to Recovery Mode again, but this time, on macOS Mojave Recovery mode. Here from the menu, double click on Install macOS.
- Then the Install macOS Installation guide should open. Click on the continue button on the bottom and Agree with the terms on the next step.
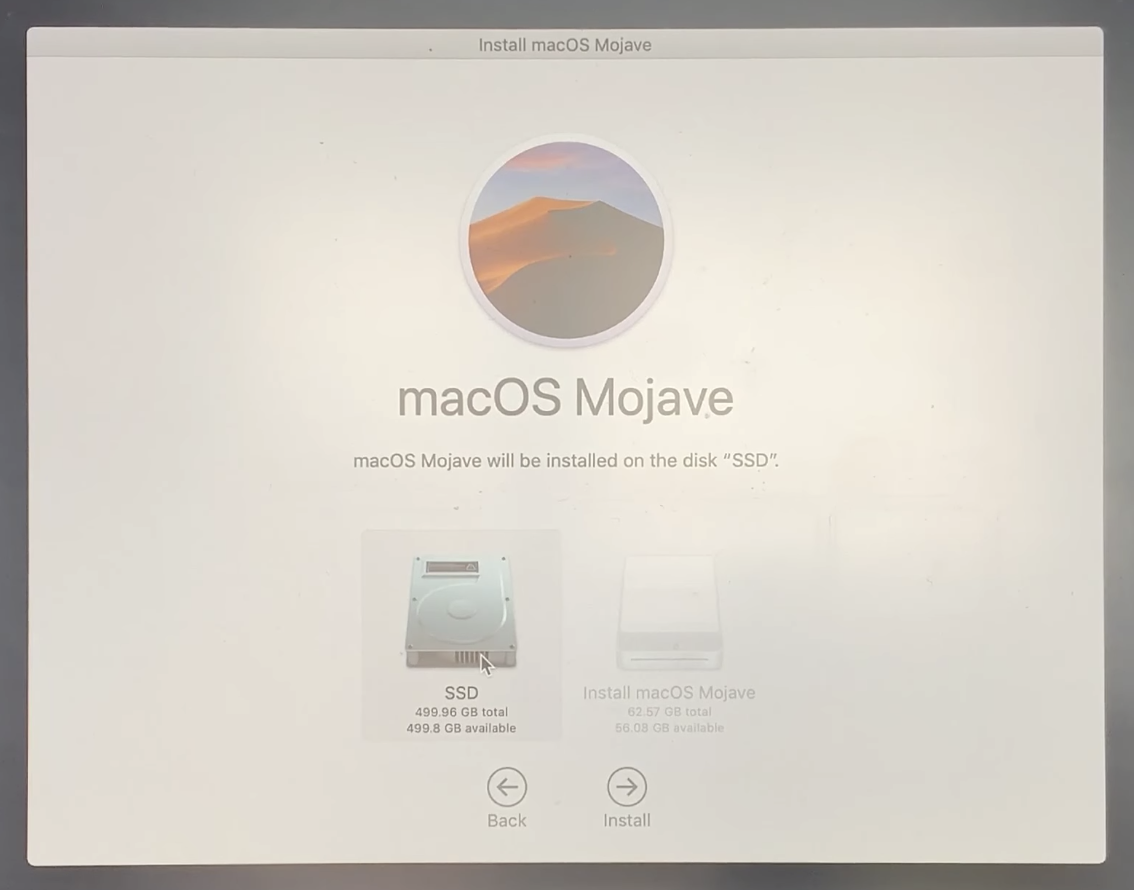
- Now you should end up to the step where you need to choose your Hard Drive to which you want Mojave to be installed. Select your Hard Drive by its name you gave to it on step 20. Click on it and then click on the Install button.
- Then this procedure should take some minutes to complete. Once it's done, your Mac will automatically reboot and enter the installation screen.
- Here you need to follow the steps exactly as you did when you first purchased your mac. This includes setting your country, keyboard layout and WiFi. Stop until you reach to the Transfer Information to This Mac and follow step 28.
- From the Transfer Information to This Mac instruction step, select From a Mac, time Machine backup or startup disk option. This will allow to transfer all of your data from your external backup storage device to this Mac. Then click on Continue.
- Then choose your Time Machine Backups disk. In case it's not being recognised, try disconnecting and connecting again the external drive to your mac. Then click on Continue.
- If you have multiple backups, choose the one you did most recently. In my case, it's called George's MacBook Pro. Then click on Continue.
- Here you have the option to choose whether you would like to exclude some data to transfer. In my case, I want all of my data from the backup to be transferred to Mojave, so I am going to live the settings exactly as they are and click on Continue.
- Here, set a login password to your Mac by clicking on the Set password button.
- Type your favourite password and press enter. Then click on the Continue button.
- Then wait until the transfer is complete. You Mac will reboot automatically once the transfer is complete to continue with the setup installation.
- Once the Migration is done loading, click on the quit button.
- Then your login screen should appear. Type the password you set on step 33 and hit enter to continue with the final steps.
- Then if you have a touch ID, simply follow the steps on the screen to setup your thumb ID. The first step is to keep touching the touch ID with your finger and then on the second step, to touch the ID with the edges of your finger.
- Once you are finished with setting up your Touch ID, you are now ready to use your Mac.


Commands used
sudo softwareupdate --fetch-full-installer --full-installer-version 10.14.6- download the latest Mojave firmware.sudo /Applications/Install\ macOS\ Mojave.app/Contents/Resources/createinstallmedia --volume /Volumes/mojave- burn macOS Mojave firmware to the specified Volume (mojave).
Congratulations! You are back to Mac OS Mojave. You just nailed down a difficult problem. Now your final tasks are to fix your dock by replacing those question marks (?) if you have any and if you are a developer, to update the programming languages to their latest version. Of course, you may need to re-install packages you may have been using during your development stage.
Now it's your turn. How did we do this time? Are there any steps which I didn't explain properly or were confusing? Please let me know down in the comment section and I will act ASAP.

Zamów:
Wyświetl: