


This tutorial will go through step by step on how to achieve this on your machine. Our method has 95% success rate based from our YouTube video.
That's right. Our method has been tested and received positive feedback, since our video was posted!
You will need:
- Mac computer
- Xcode (optional)
Step by step procedure:
- First thing first, make sure you have disabled System Integrity Protection on your computer. If you haven't or you are unfamiliar with it, we have another article covering System Integrity Protection on Mac.
- Once you finished with step 1, reboot your Mac to exit Recovery Mode.
- Download Xcode from the App Store. If you are getting an error similar to this:
then, follow steps 4-5. Otherwise, skip to step 6.
- Check your Mac OS. Click on the Apple logo on the left top corner and then "About This Mac"
You should see your info now. The most important bit is your Version name of your Mac OS X. In my case, it's OS X El Capitan
It's important to know when your Mac OS (Operating System) was released. Below, I am listing each Mac OS with its corresponding release date:
Mac OS version Release date macOS Catalina 2019 macOS Mojave 2018 macOS High Sierra 2017 macOS Sierra 2016 Mac OS X El Capitan 2015 Mac OS X Yosemite 2014 Mac OS X Mavericks 2013 Mac OS X Mountain Lion 2012 - Knowing the release date of your OS, navigate to the Apple Developers Program website to download the appropriate Xcode version supported for your OS (in my case, I download Xcode 7, because El Capitan was released on 2015).
Now we are going to launch Bootcamp and get the Create Windows 7 Install Disk option back! - Now go to finder and then open the Applications tab.
- Then, find a folder named as "utilities". Open it.
- Right click on BootCamp and select Show Package Contents.
- You should now see a folder named as Contents. Open it and then right click on info.plist and select Get Info.
- Then scroll to the bottom (you may need to expand the window) until you see Sharing & Permissions. Click on the locker on the bottom right of the window, type your password and change all the permissions to read & write. Your permissions should look like this:
Don't forget to lock your changes after you finish. - Now go one step back to the content folder and right click on it and select Get info.
- Follow the same procedure as step 10.
- Open the Contents folder and right click on the info.plist file and open it with Xcode.
Once you launch it you should see something like this:
Here you see all the information requirements for BootCamp. Now we are going to tweak some things to let BootCamp support our Mac model and bring back the Windows 7 Install Disk option. To do that, we need to access the information of our system. - Press command & space keys to launch spotlight.
- Now type System Information and press enter. You should see some of your system information. We only care about this information:
- Copy the value of Model Identifier. (highlight it and press command & c to copy it).
- Then go to info.plist window and go to the bottom where it says PreUSBBootSupportModels
- Rename it as USBBootSupportModels.
- On USBBootSupportModels click on the arrow to its left.
- A list should appear. Now click on the plus sign to add a new item.
Paste your model value (command & p to paste it) on the input box and press the enter key. It should look like this:
- Now go back to your system information and copy the value of Boot ROM Version.
- Then back on the info.plist, DARequiredROMVersions, click on the arrow to open the item list.
Click on the plus button to add a new item and paste your Boot ROM Version (just like in steps 17 - 18) and press the enter key. DARequiredROMVersions should look like this:
- Now save and quit info.plist (Xcode) and we are done!
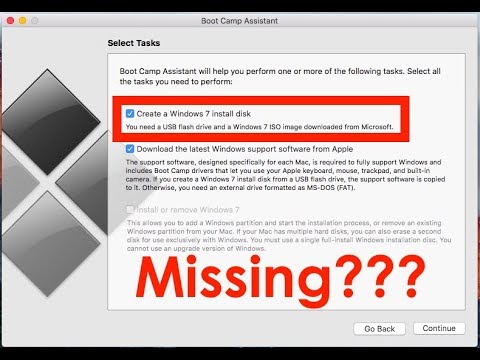
- Lastly, Launch BootCamp and you should see the Windows 7 Install Disk option key:


Congratulations! You managed to trick BootCamp to think you can still install Windows 7!
If you would like to know how to install Windows on your Mac, we have a YouTube video showing you how to do this, but with Windows 10 instead.
This video is ageing but we will update the content soon!
If you still unsure on how to install Windows 7 using BootCamp, please drop your comments below and I will write a tutorial.
Still here? Well, make sure to let me know how you feel after reading this tutorial. Do you have any questions? Was something unclear? Let me know and I will act. On top of that, if you have any suggestions on of what I should cover next, feel free to drop your thoughts down below!
Some photos were taken from our YouTube Video.

Encomenda:
Exibir: