


If you are concerned whether Windows 11 will be a good fit for you, or your workplace, then I always recommend people to put Windows 11 into a test first. But, how are you going to test them, given that there's not an easy option to go back to Windows 10? Install it as a pendrive, right?
In this video, I am going to show you how to install Windows 11 on an external hard drive, bypass the requirements and run Windows 11 on your computer!
Can I run Windows 11 from an external hard drive?
Yes. Even if you don't meet the requirements, you can still run Windows 11 from your external hard drive, SSD or USB stick. Of course, if you run Windows 11 on an old hardware, it most likely won't have a USB Type-C port, or even a USB 3.0. Given this, Windows 11 will be very slow at installation and even at launching programs. Despite that, it should be able to do simple tasks, such as browsing the web or sending emails easily without much delay.
Here are the requirements you will need to get to run Windows 11 on your machine:
- A Windows 10 (or 8.1) computer.
- An external hard drive, SSD or USB stick with lots of storage (120GB or more).
Windows 11 system requirements
Here's a snipped of the complete list for all the Windows 11 system requirements in case you are curious:
- Processor: 1 gigahertz (GHz) or faster with 2 or more cores on a compatible 64-bit processor or System on a Chip (SoC).
- RAM: 4 gigabyte (GB).
- Storage: 64 GB or larger storage device.
- System firmware: UEFI, Secure Boot capable.
- TPM: Trusted Platform Module (TPM) version 2.0.
- Graphics card: Compatible with DirectX 12 or later with WDDM 2.0 driver.
- Display: High definition (720p) display that is greater than 9” diagonally, 8 bits per color channel.
The list has been taken from Microsoft.
Recommended requirements to run Windows 11 on external hard drive
It's also recommended that your computer meets some basic requirements in order to enjoy a better experience while using Windows 11:
- Have at least 4GB of RAM and a dual core processor or better.
- An external SSD.
- A USB Type-C port on your computer.
Having a USB Type-C port, will allow Windows 11 to run smoothly on your system without big delays during the installation and launching programs. If you are not sure which SSD or HDD to get, here's an article I wrote which will help you choose your best hard drive on a budget!
How to install Windows 11 on an external hard drive? The steps
Now that we have looked at the system requirements, we are ready to dive in and install Windows 11 in you pendrive!
For this guide, I also have created a video which it may help you follow some of the steps if you get stuck!
How to download Windows 11?
Microsoft offers Windows 11 for free. Yes, that's right, just like with Windows 10. You can use Windows 11 for as long as you like, however, unless you purchase a product key, you won't get the option to personalize Windows 11 and there will be a message at the bottom right of your screen saying "Activate Windows".
- Visit the official Microsoft Download Windows 11 page.
- Under the Download Windows 11 Disk Image (ISO) section, on Select Download, choose Windows 11.
- Click on the Download button.
- Choose a language of your preference under Select the product language and press on Confirm. I picked English International.
- Click on 64-bit Windows 11. Looks like 32-bit is not yet available.
- Windows 11 now should begin to download. The ISO is about 5.2GB so it should take some time to finish.
Once the download is ready, we will need to download a tool which we are going to use to install Windows 11 on our external hard drive.
Windows 11 ISO to USB tool
For this purpose, we are going to use Rufus. Rufus is a tool which will allow us to burn the Windows 11 ISO to our external hard drive and later on to install Windows 11 on our pendrive.
- Download Rufus from the official Rufus website. Under the Download section, choose either Rufus or Rufus Portable.
- Rufus shouldn't need to be installed. It will immediately open once you double click on the downloaded .exe file.
- Connect your external hard drive if you haven't.
- Rufus should recognize your external hard drive *. In case it doesn't, click on "Show Advanced Options" and check the "Show USB Hard Drives" option.
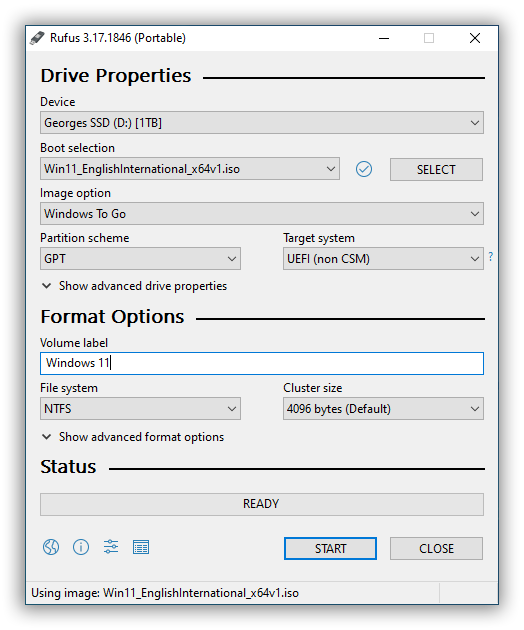
- Under Boot Selection, select your Windows 11 ISO. If you can't find it, drag and drop it from the Downloads folder.
- Under the partition Scheme choose:
- GPT, if Windows 11 is to be run on a relatively new machine.
- MBR, if Windows 11 is to be run on an older machine.
In the worst case scenario, if Windows 11 doesn't install in your target computer, then you may re-create the USB installer drive with the other Partition Scheme option. Be sure to note down which Scheme option you have used.
- Under Target System, leave it as it is (should be UEFI (non CSM)).
- Going now to the Format Options, under the Volume label, type in "Windows 11", or any other title of your own preference.
- Under the File System, leave it as NTFS.
- Press the Start button to begin.
* You can recognize your USB stick by the letters (e.g D, E, F) if you have multiple options. If unsure, go to This PC and your USB drive should show up there. If still unsure, disconnect (eject it first) and re-connect your USB stick and see what letter is used to identify it. To prevent any further confusion, disconnect all external storage devises from your computer and keep only your USB connected.

Rufus now should ask you which Windows 11 version you would like to install. If you have already purchased a product key, they be sure to select the Windows 11 version which corresponds to the product key version you have bought. If you haven't purchased the product key yet and you are thinking of getting it later, then choose the version that you are going to purchase the product key for. In my case, I will choose Windows 11 Home.
Rufus will need some time to burn the ISO onto your external hard drive. This could take a few minutes, depending on the nature of your external storage device and the connection of it with your computer.
How to boot from USB with Windows 11
Now that you have Windows 11 on your external hard drive or USB stick, it's time to boot your computer with it.
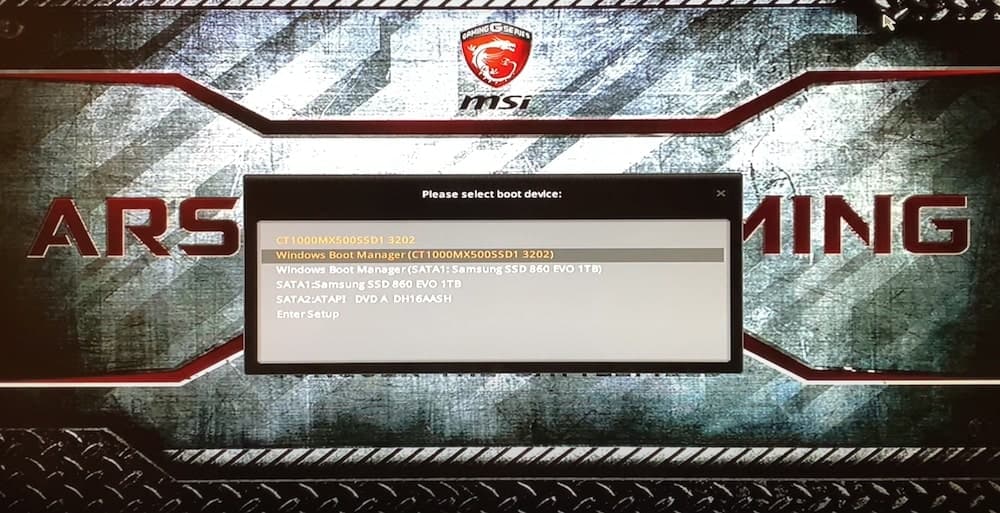
- Go to the start menu and Restart your computer.
- When the screen turns black, keep pressing the F11 key (if not the F11, it could be the F10 or F12 key).
- When the boot menu appears, use your arrow keys to select your external hard drive. Your external hard drive won't include SATA at the beginning of the label.
- Hit enter.
If you have connected your external hard drive with a USB port (3.0 or 3.1), then the loading speed will be noticeable slower. If it's extremely slow, then my advice would be to disconnect the SATA cables from your DVD/CD drive and connect them to your hard drive if it's an internal hard drive (or SSD). There are no changes to the behaviour of Windows during the installation. All you do is making Windows 11 run faster.
Windows 11 installation
Windows 11 should be booted and the installation screen should appear. The process from now and on is pretty straightforward. All you need to do is to setup the language, keyboard layout, Microsoft Account and some basic personalization options.

Once you have finished with the Windows 11 installation, then you may want to activate Windows.
How to activate Windows 11?
To activate Windows 11, you will need to get a product key. If you don't have a product key, then head over to the Microsoft Store and search for "Windows 11". Windows 11 should cost around 120$ USD.
The Windows 11 product key is a 25-character code, that looks like this: PRODUCT KEY: XXXXX-XXXXX-XXXXX-XXXXX-XXXXX, same length as the Windows 10 product key.
If you already have a product key:
- Click on the Start menu and go to Settings.
- On Settings go to System > Activation > Update Product > Change Product Key.
- Enter your product key.
Conclusion
That's it! Now you can enjoy using Windows 11 on your PC with unsupported hardware. We managed to bypass the requirements and successfully run Windows 11 without the need to worry about about the system requirements.
Here's a task for you. Check whether your favorite games and applications work for Windows 11. Given that Windows 11 still support 32-bit applications, there shouldn't be many compatibility problems with your applications.
In case you have any questions or you are stuck with any of the steps, please do let me know in the comments section below and I will try to reply as soon as possible.
In the meantime, I hope you stay safe and healthy!

Замовити:
Дисплей: